|
Installation instructions for Leather Pro #27 bag for 94 & newer Sportster will not fit 96 & newer XL 1200S
Rear turn signals must be moved with H-D relocation kit #68471-94B
If using H-D detachables that leave your turn signals in stock location you will also need H-D 90465-98A and skip steps 1-3 on this sheet and use instructions on sheet marked "For detachables"
Starting on right side of bike
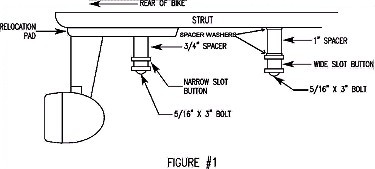
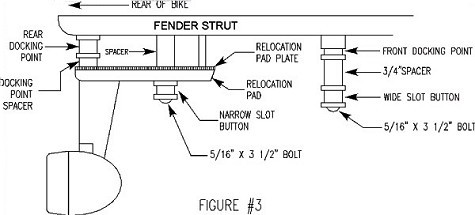
- After turn signals have been relocated, remove the two 5/16" bolts from the strut.
- Replace the rear bolt with 5/16" X 3" bolt, NARROW slotted button, 3/4" spacer, and nyloc nut from this kit.
- Replace the front bolt with 5/16" X 3" bolt, WIDE slotted button, 1" spacer, 2 washer spacers, and nyloc nut from this kit. Your strut should now look like figure #1.
- NOTE The following step requires that the bike frame be sufficiently supported as the lower shock shock bolts must be temporarily removed. A bike lift is recommended.
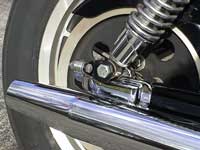
Raise the frame slightly to take the weight off of the rear suspension. Remove the lower shock nut, bolt and washer. Discard washer and reinstall with roller bracket as per Figure #2. (tear drop end down) Make sure roller is perpendicular to swingarm pivot point! Loctite lower shock nut to 30-50 ft. lbs. making sure roller bracket does not twist. Repeat steps 1-4 for left side of bike.
- To install bags, open lid and peel up velcro vinyl cover, exposing inside lever and pull lever up. With bag tipped up slightly in front, slide bracket on the back rear of bag onto rear button on strut. Then lower front of bag onto front button on strut. Push down on lever. If lever does not lay horizontal, bag is not installed properly. Now peel up velcro nylon strap. While pulling up on nylon strap, press knee into bag to flex bag tight against the roller bearing. Now velcro strap back down. Lever can now be locked down with supplied lock. Lay vinyl cover back down, and velcro into place.
- 6. To remove bags you must peel back the velcro on nylon strap to relieve tension on buttons. Pull up on lever and tip front of bag up about 1" then move bag up and forward.
Boss Bags, Inc.
111 Industrial Park Av.
Hortonville, Wi 54944
www.bossbags.com 888-853-9975
|
|